If you’re planning a mid-rise or commercial building in a colder climate, you must be weighing the implications of our harsh North American winters. Snow and ice build-up poses severe threats to your property’s users; and, it’s a liability for you. But did you know that there’s a safer, healthier, and cheaper way to rid your property of snow and ice than with mechanical clearing and salt?
This post will explore the benefits of Snow and Ice Melting systems in mid-rise applications, as well as the best ways to install them.
How Are Snow Melt Systems Used in Mid-Rise Applications?
SIM systems use a network of tubes to circulate hot water beneath outdoor surfaces to melt snow and ice. They are commonly used in decks, driveways, parkades, ramps, roads, sidewalks, and stairs.
Why Your Mid-Rise Building Will Benefit From a Snow Melt System
SIM systems can benefit a property in several ways. For one, they create safe conditions for your property’s users. Because they don’t let snow and ice accumulate, there’s less risk of slip-and-falls, or vehicular accidents, happening before clearing crews can get to work. With a reduced potential for accidents, your liability risk drops, and your property stands to benefit from lower insurance premiums.
Avoiding salting and shoveling can protect your property from premature wear and tear. Without scraping, salting, or sanding, surfaces such as driveways, sidewalks, and ramps will get a longer lifespan. And since SIM systems are heated with modern, high-efficiency boilers, heat pumps, or waste heat, they emit relatively little CO2.
While we may perceive them as a luxury, SIM systems cost surprisingly little to operate.
Let’s look at an example in Albany, New York, where a SIM-heated, 1,000ft2 garage ramp sees roughly 20 snow events per year, totaling 156 hours of snowfall. With hydronic heating, the 6-inch deep concrete ramp requires a heat output of 125 BTU/h/ft2 to stay 100% snow-free during 90% of snowfalls. This power consumption translates into an annual gas bill of just $160-$200. Contrast this with the $1,000s per year in labor, equipment, and supply costs that facility owners typically spend on regular plowing.

Don't miss a thing!
Subscribe for exclusive content, insider industry news and limited edition webcasts.
How Are Snow Melt Systems Installed?
SIM systems work well under almost all surfaces, as long as heat loss to the ground below can be minimized with the right insulation product.
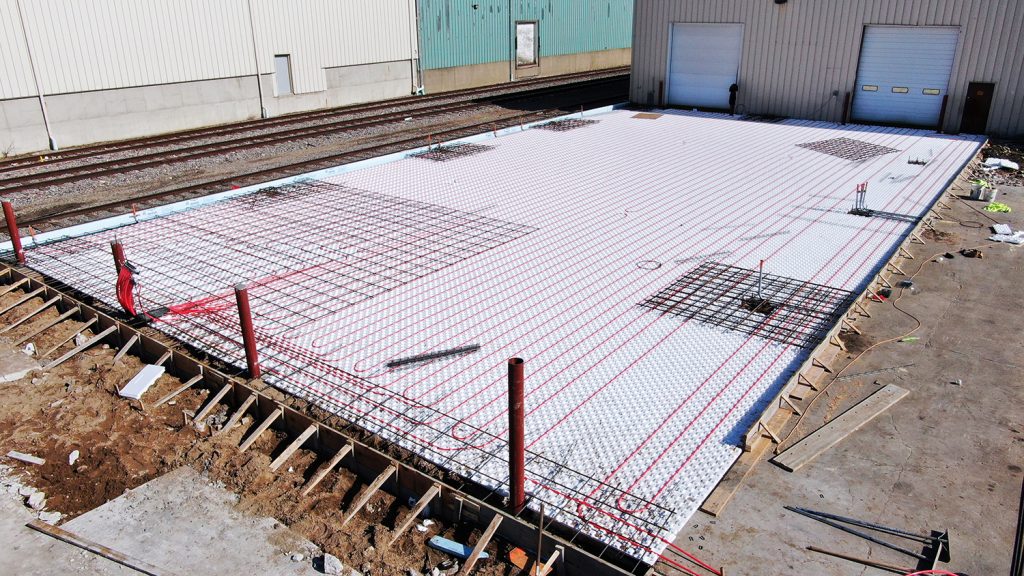
That said, certain installation techniques function better for specific surface types. For instance, Heat-Sheet® makes the optimal “base” for hydronic tubing if you’ll cover it with poured concrete. In this scenario, you’d lay the Heat-Sheet panels down and walk the tubing in place (no stapling required!). Typical tubing circuits typically measure 150-300ft, and the tubes can be spaced 6 to 9 inches apart. You can pour the concrete with the tubing set, but be sure to provide at least 2-3 inches of cover for the tubes.
On the other hand, if your surface comprises interlocking pavers, you’re better off stapling the tubes to sturdy under-slab insulation boards, such as Halo’s Subterra. After securing the tubes, you can encase them in 1 1/2 inches of sand before compacting the sand bed to 1 1/8 inches and placing the pavers on top.
With an asphalt surface, you’d also use Subterra boards as the insulation layer and encase your tubing with either stone dust or sand before setting in the asphalt. During this final installation stage, it’s best to run 150°F water through the tubes to help the asphalt cool.

Snow Melt System Design Tips
A SIM system performs 3 essential functions: it warms the snow, then melts it, and finally evaporates or drains the water.
Your system’s design must facilitate these 3 steps. To bring the surface to a melting temperature, you’ll need a heat output of 0.51 BTU/lb. Then, you’ll need to boost the output to 144 BTU/lb to turn the snow into cold water. Finally, your SIM system must continue running until the melted snow evaporates. To conserve energy and save on heating costs, you can design your surface to allow sufficient drainage.
The drainage design for the heated surface shouldn’t differ much from what you’re doing elsewhere on your property. Slope the surface to let the water run off to the lowest points of your property, away from the building, and in a way that won’t create additional hazards. Plan your catch basins’ locations and ensure that the trenches won’t freeze in chilly winter months. Be sure to follow your local code when you connect your drain to the storm sewer.
Wrapping It Up
SIM systems offer various benefits: they’re safer, more cost-efficient, and less harmful to your property than mechanical snow and ice removal methods.
Opting for Heat-Sheet panels to support your SIM system under a poured concrete surface gives you high R-values of R-10 and up, enough compressive strength to withstand vehicular traffic, breathability, low embodied carbon.
What’s more, you’ll see up to 4 times more savings in installation labor compared to traditional radiant tube placement methods.


