At A Glance
Proper manifold setup ensures efficient zoning, reliable performance, and easier long-term maintenance.
Choosing the right materials, such as Heat-Sheet Heavy and Subterra, maximizes system effectiveness.
Precise tubing installation within Heat-Sheet channels prevents shifting and maintains even heat distribution.
Coordinating with concrete crews and accounting for Heat-Sheet nodules ensures a durable, high-performing slab.
Thorough system testing and routine maintenance extend the life and efficiency of the radiant heating system.
In our March post, we explored the initial steps of installing radiant heating with Heat-Sheet Heavy, guided by Kyle Stumpenhorst from RR Buildings. In this next installment, we delve into the techniques involved in setting up manifolds and arranging tubing effectively, drawing from Kyle’s jobsite experience. Collectively, these two posts aim to provide an effective step-by-step guide, ensuring that your radiant heating system is set up for maximum efficiency and longevity. Plus, for further reference to supplement the tips below, you can view the full video from Kyle here.
Understanding Manifold Functionality
The manifold acts as the central hub in a radiant heating system, controlling the flow and temperature of water through the tubes embedded in the concrete. Proper installation of the manifold is critical for system efficiency and ease of maintenance. Start by identifying the zones of your building and assign a manifold to each, considering factors such as area size and heating requirements.

Selecting the Appropriate Materials
Kyle also emphasizes the importance of choosing the right materials for different sections of the installation. While Heat-Sheet Heavy is preferred for its structured channels that facilitate straightforward tube laying, Subterra sheets were used in those areas requiring more flexible tube positioning. This dual approach allowed for tailored application that maximized the effectiveness of the heating system.
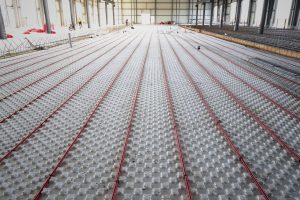
Tubing Installation Techniques
One of the most critical aspects of radiant heating installation is the precise placement of tubes. Kyle recommends laying out the tubes systematically within the designated channels of Heat-Sheet, ensuring they are securely attached to prevent any movement during the concrete pour. This meticulous approach maintains the integrity of the heating distribution.

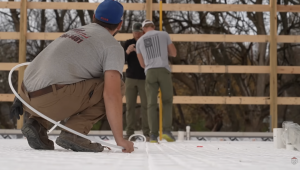
Pre-Concrete Pouring Preparations
Before the concrete is poured, a final inspection of the tubing layout is necessary. This includes checking the alignment of tubes, ensuring that there are no kinks or loops that might impede the flow of hot water, and confirming that all tubes are tightly secured. This step is crucial as any errors become difficult to rectify once the concrete sets.
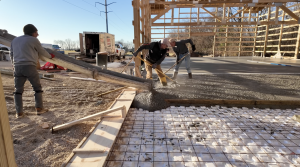
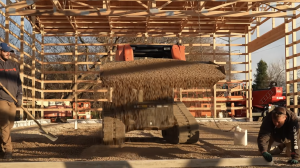
Concrete Pouring Strategy
Kyle advises coordinating closely with the concrete contractors to ensure that the pouring process does not disrupt the tube layout. The concrete should be carefully poured and leveled to fully encapsulate the tubing, avoiding any air pockets or gaps that could affect thermal conductivity. In this case Kyle used a plasticizer instead of additional water. He also used a concrete buggy to place concrete and the Heat-Sheet Heavy (with a layer of plywood) took the load!
Kyle also points out that you need to account for the depth of the Heat-Sheet nodules when ordering the concrete for your slab!

System Testing and Adjustments
After the concrete has cured, it’s important to test the radiant heating system thoroughly to ensure everything is working as expected. This includes checking the pressure and temperature across different zones and making any necessary adjustments to the manifold settings.
Long-term Maintenance Tips
Kyle also highlights the importance of regular maintenance to prolong the life of the heating system. This includes periodic checks of the manifold pressure, flushing the system to remove any debris, and inspecting the tubing accessible from manifold locations for any signs of wear or damage.
Don't miss a thing!
Subscribe for exclusive content, insider industry news and limited edition webcasts.
Wrapping It Up
By following the detailed guidelines provided by Kyle Stumpenhorst and using the right materials and techniques, you can ensure a high-performing radiant heating system that provides consistent, comfortable heat distribution throughout your property. And once again, you can view the full video from Kyle right here.